Introduction
In this lab assignment, we will take a simple C unit test framework and parallelize it using multi-processing. Each process will run a separate test and will then need to communicate its test results to the main process that collects the results and prints information back to the user.
Leaning Objectives
At the end of the assignment, you should be able to:
- Parallelize a simple unit testing framework using
fork,exec, andwait. - Use pipes to exchange information between related processes.
- Use signals to detect misbehaving processes and collect information about them.
Getting the Source Code
We will do this lab in the main branch of your labs repository. To make sure
you are on the right branch, check it out using:
$ git branch
The branch you are currently on will be highlighted for you (with a * next to its name).
If you are working on the main or master branch, then follow these
instructions:
  $ git fetch upstream
  $ git pull upstream main
At this stage, you should have the latest copy of the code, and you are good to
get started. The starter code is contained under the process_lab/ directory.
If you are currently on a different branch (say you are still on clab_solution
from the last lab), then we need to switch to main or master (depending on
your default’s name).
First, add, commit, and push your changes to the clab_solution to make sure
you do not lose any progress you did on the last lab. To check the status of
your current branch, you can use:
$ git status
This will show you all the files you have modified and have not yet committed
and pushed. Make sure you add those files, then commit your changes, and
push them.
If git push complains about not knowing where to push, you’d want to push the
current branch you are on. So for example, if I am working on clab_solution,
then I’d want to do git push origin clab_solution.
Now, you are ready to swap back into main (or master).
$ git checkout main
Then, grab the latest changes using:
$ git fetch upstream
$ git pull upstream main
At this stage, you should have the latest copy of the code, and you are good to
get started. The starter code is contained under the process_lab/ directory.
Starter Code
The starting code for this lab consists of 5 test dummy test functions,
test1() through test5(), which are simply functions that accept no arguments
and return a character pointer that is NULL when the test is passed
successfully (thus the macro #define TEST_PASSED NULL).
The line char *(*test_funcs[MAX_TESTS])(); declares an array test_funcs of
function pointers, where each pointer points to a function that returns a char
* and accepts no arguments. test_funcs will be the list of test functions
that we need to run in parallel.
The remaining functions, add_test and setup, simply emulate what would
happen in a real unit test framework and maintain the tests that are in use.
run_all_tests is the function that you should be implementing, as its name
suggests, it is in charge of running all tests in the test suite and then
collecting their results.
Compiling the Code
Similarly to the previous lab, we have provided you with a simple Makefile
that will automate the process of compiling and linking your code. To build the
lab, simply issue the make command from the Linux terminal:
$ make
cc -ggdb -c -o simple_test.o simple_test.c
cc -ggdb -o simple_test.bin simple_test.o
Step 1: Run All the Tests in Parallel using fork
In this first step, we will implement run_all_tests to run our tests in
parallel using multi-processing. For each test, you should fork a process that
runs the setup code using a call to setup(), and then runs a test from list of
available tests in the test suite. Note that each process you create should only
run a single test and then exit.
Note that your implementation should not be dependent on the number of test
cases declared in this test suite (5 in our case). In other words, fork the new
processes should happen in a for loop that depends on the num_tests variable
and not on the hard coded number 5.
After forking the test, the main process (the one that runs run_all_tests)
will have to wait for all of its forked children and then print Test Done
after each of them is done.
Here is an example output from my test run. Note that the order of the print outs might not match yours, and that is okay.
$ ./simple_test.bin
starting setup
starting setup
starting setup
starting test 1
starting test 2
starting test 3
ending test 1
ending test 2
Test Done
Test Done
Test Done
Step 2: Getting Test Results
In this step, we would like to obtain the results of each test that we run. Each
test function (like test1() and so on) will return a character string that is
NULL on success, and contains a message on failure. However, accessing these
test result string from the main process is not possible since processes address
spaces are isolated. Therefore, we would need other solutions.
In this step, we will make use of process exit code. For each child the runs a test, the child will exit with code 0 on success, and code 1 on failure. In other words, our children will run something that looks like:
char *tresult = test_funcs[i];
if(tresult == TEST_PASSED)
exit(0);
exit(1);
Then the parent can use the WEXITSTATUS macro to obtain the status code of an
exiting child and then print Test Passed or Test Failed depending on whether
the exit code is 0 or something else.
Running this on my machine gives something that looks like the following:
$ ./simple_test.bin
starting setup
starting setup
starting setup
starting test 1
starting test 2
starting test 3
ending test 1
ending test 2
Test Passed
Test Failed
Test Passed
Note that:
- The tests complete in a random order so it is not clear what test failed or successes when we return from wait. We will take care of that in step 6.
- We would like to print the test result message but using
wait, we only have access to the child process’s exit code. So we will leave that until step 6 as well.
Step 3: Running Tests in Parallel with Only One Setup
When we create a fork, the child process is a new copy with a separate memory
address space from that of the parent. That memory address space is an exact
copy of that of the parent, which is why we are able to data matrix in all of
our tests cases.
In this step, we will need to modify the code so that the main parent process runs the setup only once before forking, and then make use of the fact that memory is copied to make sure that all children operate on the same copy of the data.
This should be a very small change in your code, and the output should look something like:
$ ./simple_test.bin
starting setup
starting test 1
starting test 2
starting test 3
ending test 1
ending test 2
Test Passed
Test Failed
Test Passed
Note that starting setup is only printed once.
Step 4: Have a Special Result for Crashed Tests
One of the advantages of running our tests in separate processes is that if one test crashes due to a segmentation fault or any other error, then only that process running it will fail, and other processes will continue execution. In this step, we would like to detect if a test crashes and print an appropriate message in that case.
First, uncomment the line add_test(test4) in the main function and then
recompile the code. Second, add code in your run_all_tests function to detect
crashed tests and print Test Crashed correspondingly. Running this should
generate something like the following:
$ ./simple_test.bin
starting setup
starting test 1
starting test 2
starting test 3
starting test 4
ending test 1
ending test 2
Test Crashed
Test Passed
Test Failed
Test Passed
Step 5: Stop Tests that Run Forever After 3 Seconds
Some tests might misbehave and run for a very long time, therefore we would like
to detect such misbehaving tests and stop them after a specified time out. In
this lab, we would like to add the feature to stop any test that runs lionger
than 3 seconds. For this step, uncomment the line add_test(test5) in the
main function and recompile the code.
Modify your code so that any process that runs for longer than 3 seconds should
be stopped, and then the main parent process must detect that and print Test
Timed Out. After implementing this, your output should look something like:
$ ./simple_test.bin
starting setup
starting test 1
starting test 2
starting test 3
starting test 4
starting test 5
ending test 1
ending test 2
Test Crashed
Test Passed
Test Failed
Test Passed
Test
Timed Out
HINT: the easiest way to do is using alarm to get the child out of its infinite loop and into a signal handler. Then you can exit with a special exit code. Don’t remember about alaram? man alarm.
Step 6: Use Pipes to Display Test Errors
For this last stage, we would like to obtain the resulting messages from each
test using inter-process communication. Specifically, we will be using Unix
pipes to pass character arrays between the children and their parent. For more
information, take a look at the man page for pipes using man 2 pipe from your
Linux terminal.
In our case, we would like every process that fails a test case should use a
pipe to communicate the error message back to the main parent. To do this
successfully, we would need to create a pair of pipes between our main parent
and every child process and then read from that corresponding pipe end when the
child returns. However, we have a slight complication. In our current
requirements, we are using the wait function to collect the children
processes, and when wait returns, we do not know exactly which child was the
one that returned, and thus we cannot know which pipe to read from.
To solve this problem, we will use the function waitpid instead of wait,
check out the man page for wait using man wait. Specifically, waitpid
accepts three arguments: the first is the pid of the child we would like to wait
for, the second is the pointer to an integer where we would like to store the
exit code of the child, and the third is a set of options that we won’t be using
in this class and thus can pass as 0.
Hint: You might find it useful to keep track of all of the created children’s process IDs in an array.
When you’re done, your output should look something like:
$ ./simple_test.bin
starting setup
starting test 1
starting test 2
ending test 1
starting test 3
ending test 2
starting test 4
starting test 5
Test Passed
Test Passed
Test Failed: test 3 always fails
Test Crashed
Test Timed Out
Optional Practice: Prime Sieve
In this problem, we would like to implement the primes sieve, an idea due to
Doug Mcllroy, the inventor of Unix pipes. Your solution should use fork and
pipe to set up a pipeline and check the first prime numbers that are less
than 35.
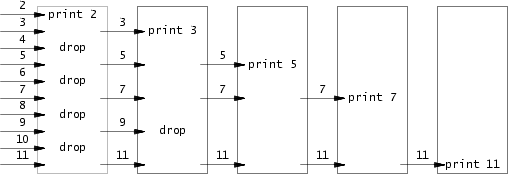
The first process generates the number 2 through 35 and feeds the numbers that are not multiples of 2 into the pipeline. The second process eliminates the multiples of 3, the third process eliminates the multiples of 5, and so on and so forth. For each prime number, you will create a process that reads from its left neighbor and write to its right neighbors, as shown in the figure below:
Your implementation should satisfy the following requirements:
- Once the main process reaches the number 35, it should wait until the entire pipeline terminates, including all children and grandchildren, etc.
- Processes should only be created on a per-need basis, i.e., you should not preallocate all processes and then run the sieve.
- The program should terminate when all the pipeline has been destroyed, i.e., there shouldn’t be any zombie or orphan processes.
- Each prime number must be printed by a separate process.
Pseudocode
To help you in this implementation, here is a simple pseudocode that illustrates what each process in the pipeline must do
p = get a number form left neighbor
print p
loop:
  n = get number from left neighbor
  if(p does not divide n)
    send n to right neighbor
Here is an example output:
$ ./primes.bin
prime 2
prime 3
prime 5
prime 7
prime 11
prime 13
prime 17
prime 19
prime 23
prime 29
prime 31
You do not have to submit this file, this is only for your practice.
Submitting your code
There are no special submission requirements for this lab, you only have to
submit the simple_test.c file. Please do not submit any other files than
simple_test.c.
Submission Checklist
- My code compiles and generates the right executables.
- I submitted
simple_test.cto Gradescope.
Grading
Check out this assignment’s grading page for more information.