EXT2 FileSystem Lab
- Introduction
- Learning Objectives
- Getting the Source Code
- Understanding ext2
- Finishing our implementation
- A Working Tool
- Valgrind
- Turning in
- Rubic
- Acknowledgement
Introduction
In this project, you’ll finish the implementation of a program that understands the on-disk format of a Linux “ext2” filesystem and walks through its directory hierarchy to read some files. We’ve provided most of the code for you, but we have omitted the implementation of some key functions. Your job is to fill in the omitted code.
To help you know whether or not your code is correct, we’ve provided you with a bunch of test code that examines the data structures and file content retrieved by your code, and compares them to the known-to-be-correct values. Once your code passes all of our tests, you’re done! If your code fails some of our tests, you can look at the tests and the expected values they print out, to help you diagnose your errors.
Learning Objectives
At the end of this lab, you should be able to:
-
Define the operations of a filesystem in the scope of ext2.
-
Implement several filesystem operations based on the abstractions provided by ex2.
Getting the Source Code
We will do this lab in the main branch of your labs repository. To make sure
you are on the right branch, check it out using:
$ git branch
The branch you are currently on will be highlighted for you (with a * next to its name).
If you are working on the main or master branch, then follow these
instructions:
  $ git fetch upstream
  $ git pull upstream main
At this stage, you should have the latest copy of the code, and you are good to
get started. The starter code is contained under the threads_basics/ directory.
If you are currently on a different branch (say you are still on
clab_solution from a previous lab), then we need to switch to main or
master (depending on your default’s name).
First, add, commit, and push your changes to the clab_solution to make sure
you do not lose any progress you did on the last lab. To check the status of
your current branch, you can use:
$ git status
This will show you all the files you have modified and have not yet committed
and pushed. Make sure you add those files, then commit your changes, and
push them.
If git push complains about not knowing where to push, you’d want to push the
current branch you are on. So for example, if I am working on clab_solution,
then I’d want to do git push origin clab_solution.
Now, you are ready to swap back into main (or master).
$ git checkout main
Then, grab the latest changes using:
$ git fetch upstream
$ git pull upstream main
At this stage, you should have the latest copy of the code, and you are good to
get started. The starter code is contained under the ext2/ directory.
Understanding ext2
In this section of the project web page, we’ll give you a good enough
understanding of the ext2 filesystem to finish the project. If you’re
curious for more information, there are several books and web pages
that discuss the ext2 file system in gory detail; for example, see
chatper 9.1 of The Linux
Kernel,
or this very detailed doc.
ext2 (the “second extended filesystem”) has a data structure and
on-disk layout that is similar to (but more complicated than) the
idealized filesystem we covered in class. Here’s a picture describing
ext2’s on-disk layout:
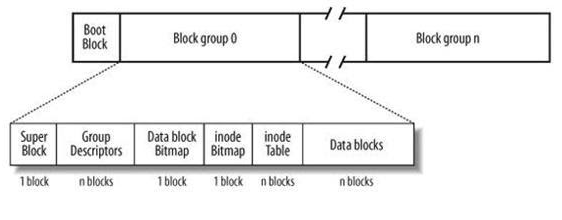
At one level, an ext2 filesystem is just a series of blocks on disk, starting with block 0 and ending with block N, where N = (disk_size / block_size) - 1. The block size of an ext2 filesystem is a parameter chosen when the filesystem is formatted: you shouldn’t assume any particular blocksize, though in practice you’ll typically encounter 1024 byte or 4096 byte block sizes. So, if you need to fetch block 5 off of the disk, you’d fetch blocksize bytes starting from offset 5*blocksize on disk.
At a different level, ext2 splits the disk into an initial boot block that the BIOS of the computer fetches and executes during the boot process, followed by a series of “block groups.” A block group is a set of adjacent blocks. Blocks within the same block group tend to be spatially close to each other on the disk, and therefore quick to seek between. Blocks in different block groups might be very far apart. In ext2, each block group has a fixed size, selected at the time the filesystem is formatted.
Each block group is split into a set of sections:
-
the superblock is the first block within each block group. It contains a bunch of metadata describing the file system, such as the block size, the number of blocks in a block group, and other information. Each block group in an ext2 filesystem contains a copy of the superblock. (Note that in later revisions of ext2, fewer copies of the superblock were made, but for this project you can assume the superblock exists as the first block of every block group.)
-
the group descriptor table occupies some integral number of blocks following the superblock. The group descriptor table contains one descriptor entry for each block group in the filesystem. A descriptor entry describes various things about its associated block group, including the block number at which its inode table begins. Descriptor entry 0 refers to block group 0, descriptor entry 1 to block group 1, and so on.
If there are N block groups in the file system, there will be N group descriptors entries in the group descriptor table. Since a group descriptor has a known size (32 bytes), you can use the information in the superblock to calculate how many block groups there are, and therefore how many group descriptors there are, and therefore how many blocks the group descriptor table occupies.
Each block group in the file system contains a full copy of the group descriptor table.
-
the data block bitmap is a bitmap that indicates which of the data blocks within this block group have been allocated, and which are free for allocation. You won’t be accessing or using this bitmap in this project.
-
the inode bitmap is a bitmap that indicates which of the inodes within this block group have been allocated, and which are free for allocation. You won’t be accessing or using this bitmap in this project.
-
the inode table is an array of inodes. Each inode occupies 128 bytes. The structure of an inode is roughly what we covered in class; you’ll dig into the details during your implementation. An inode of a file contains the file’s type (e.g., directory vs. regular file), the size of the file’s data, pointers to direct data blocks, a singly indirect block, a doubly indirect block, and a triply indirect block.
The superblock tells you how many inodes there are in a block group, and given this, you can calculate how many blocks the inode table occupies.
-
the data blocks section is an array of data blocks used to store files’ content.
Directories
In ext2, a directory is just a file that happens to contain specially formatted data. A directory file contains a linked list of variable-sized directory entries. Each entry in the directory contains an inode number for that entry, a filename for the entry, and an offset to the next entry in the linked list. So, by reading the contents of a directory file, you can find out the names of files within that directory, as well as the inode numbers for those files. Note that every directory contains two special entries, one for the “.” file (the current directory), and one for the “..” file (the parent directory).
For detailed information about what a directory file looks like in ext2, look here.
There are two details you may encounter. First, when a file is deleted from a directory, it’s possible that the directory file itself is not repacked to fill the gap, but rather a “hole” gets created in the directory file where the deleted file’s directory entry used to live, and the linked list structure will jump over the hole.
Note that there is a second directory format (the so called Indexed Directory Format) for directories with tons of files. Our system won’t support that.
Inodes
An inode in EXT2 is 128 bytes long, and contains many different fields. For this project, we only care about a few of them:
-
the i_size field indicates the number of bytes stored in the file, i.e., the file’s length.
-
the i_block array is an array of 15 block numbers.
- The first 12 entries in the array (i_block[0] through i_block[11]) contain the block numbers of direct blocks: they name data blocks that contain the first 12 blocks worth of the file’s content.
-
The 13th entry in the array (i_block[12]) contains the block number of a singly indirect block: it names a block that contains an array of 4 byte block numbers; each of these blocks contains additional file contents.<p>
-
The 14th entry in the array (i_block[13]) contains the block number of a doubly indirect block: it names a block that contains an array of 4-byte block numbers, each of these blocks in a singly indirect block, that contains an array of 4-byte block numbers of direct blocks.
- The 15th entry in the array (i_block[14]) contains the block number of a triple indirection block.
Summary
This is basically everything you need to understand about how EXT2 lays out its data on disk. Let’s dive into the implementation, picking up additional details as needed…
Finishing our implementation
Getting familiar with the code we’ve given you
First, checkout the source code for our partial implementation. Poke around in the source code to get a general idea of its structure. The “main()” function lives in testcode.c. The bulk of the program lives in ext2access.c; you’ll be adding code to functions in that file. The inc/ directory contains header files that declare in-memory structures used by the file system code.
Second, compile the program with “make”.
Finally, try running the testcode program. You’ll need to pass an argument that is the name of a file containing a valid ext2 file system image. We’ve provided such an image for you in 451_filesystem.ext2. So, to run the program, issue the command:
$ ./testcode 451_filesystem.ext2

metadata tests...
 - 'fsm->disk_size' == 53248000  OK [+1 pt]
 - 'fsm->block_size' == 1024  failed! (was 33554432)
 - 'fsm->num_blocks' == 52000  failed! (was 32558)

blockgroup descriptor table tests...
 - 'bgdt[0].bg_free_blocks_count' == 6288  failed! (was 0)
 - 'bgdt[num_descriptors_in_table-1].bg_free_blocks_count' == 1973  failed! (was 0)

fetch_inode() tests...
[1]    2862 segmentation fault (core dumped)  ./testcode 451_filesystem.ext2
Note that the program will print out the results of our test code, and that the test code assumes you’re running the program against the 451_filesystem.ext2 image. Because some of the implementation is missing, the program in its current, unfinished segfaults. As you get more of the implementation working, you’ll get further through its execution, and see more of the tests and their results. Eventually, when you have your implementation fully working, it will print out how many total points your implementation has earned.
The 451_filesystem.ext2 file does contain a mountable file system image; if you were to write the contents of this file into a raw hard drive, you’d be able to mount it from your computer.
Even better, you can mount the file as a disk on your linux vm. This is strictly optional but here’s the commands to do it:
mkdir /tmp/myext2disk
sudo mount -o loop -t ext2 451_filesystem.ext2 /tmp/myext2disk
ls /tmp/myext2disk
Just don’t edit anything as it will break the tests which assume this particular file configuration. When you’re finished poking around, type “sudo umount /tmp/myext2disk” to unmount the file.
load ext2_metadata
Loading the superblock
Let’s get going with the code. Begin by opening up the file
extaccess.c in your favorite editor. This file is where you
will be spending the bulk of your time in this project. The first
function defined in this file is load_ext2_metadata this function
will read the superblock stored in the first blockgroup of the disk
image into memory, and even better, into a “struct os_superblock_t”
structure. This structure is defined in inc/superblock.h.
The first issue is that the data we need is located at byte 1024 of
our source file. To a certain size of data at a particular location
we need to use lseek and read. lseek (when used with the SEEK_SET
parameter) moves the file read to a particular position. read reads a
certain number of bytes into memory. Something like this:
lseek(fd, my_file_offset, SEEK_SET);
read(fd, my_memory_location, my_data_size));
But how do we parse that raw data into all its many many fields?
We’ll use a trick. The os_superblock_t struct is designed to exactly
mirror the way the data is being stored in the disk image. As a
result, if we load the raw disk image data into the address of a
os_superblock_t variable, we can access the individual fields of the
structure without having to manually parse the data.
This trick makes some strong assumptions about how the compiler lays out C structs in memory. This isn’t always safe to do, but we’ve verified that our implementation works on Linux and Mac OS X on x86 machines.
One you get this working the metadata and blockgroup descriptor tests should pass.
calc_metadata
The out of the function is supposed to be a struct os_fs_metadata_t
object. This is constructed using the superblock data, but
transformed slightly to make it easier to work with. Take a look at
the commends and code in calc_metadata but you shouldn’t need to edit
anything if you’ve done the previous part correctly.
Implement fetch_inode
Given an inode number, fetch_inode() should read the associated inode
off of disk into a struct os_inode_t structure passed to the
function by the caller. (Note that the caller passes a pointer to an
already-allocated structure as an argument to fetch_inode(), so you
don’t need to malloc anything inside fetch_inode() itself.)
The hard part in implementing this function is figuring out where the inode with a given inode number actually lives on disk. We’ve provided a lot of hints on how to figure this out…just follow the steps we’ve laid out. Here’s a potential stumbling block you should avoid falling prey too: the first inode in the filesystem has inode number 1, not inode number 0. (Bleah!)
“struct os_inode_t” is defined in inc/inode.h.
You’ll want to familiarize yourself with it.
As before, compile and run testcode until you pass all of our tests for this function. As calibration, our implementation has about 14 lines of code.
Finish the implementation of calculate_offsets
calculate_offsets() accepts the block number to read from a file,
and figures out whether that block number is accessed through one
of the 12 direct blocks in the inode, or through the single
indirection block, or through the double indirection block, or through
the triple indirection block. If it should be accessed through
indirection blocks, it figures out the indexes into those blocks to use.
This code is pretty tricky, but it’s useful to get a sense for what it’s doing and what’s involved with getting it right.
We’ve given you the start of this code, but we’ve left the cases for double indirect blocks and triple indirect blocks for you to do.
As calibration, our implementation of the missing piece has about 10 lines of code.
Read through file_blockread
file_blockread() will read a block from a given file off of the file
system into memory. The caller passes in an inode for the file it
wants to read from, and the block offset within that file to read.
For instance, if the blocksize is 1024 bytes, then to read bytes
0-1023 from the file, the caller would pass in block offset 0. To
read bytes 1024-2047 from the file, the caller would pass in block
offset 1.
file_blockread() uses the offsets and indexes calculated by
calculated_offsets() to do the actual reading. The only real
complication is that ext2 supports the notion of “holes” in files:
ranges of a file that logically exists containing zeroes, but which
don’t have any physical data blocks allocated to store the zeroes.
We’ve coded this function for you. Read through the implementation to get a sense of how it works, and make sure you understand the interface to this function – i.e., how to invoke it, what the arguments mean, and what gets returned by the function on success or failure.
Implement file_read
file_read() will read the full contents of a file from disk into
memory. The caller passes file_read() the inode number of the
file it wants to read, and file_read() will:
- convert the inode number into a “
struct os_inode_t” usingfetch_inode(), - allocate space for the full contents of the file,
- loop through the blocks of the file, using
file_blockread()to read them into memory.
As before, compile and run testcode until you pass all of our tests for this function. As calibration, our implementation has about 22 lines of code.
Implement scan_dir
Given the contents of a directory file, the length of the directory file, and a file name, this function scans through the directory file looking for a directory entry that matches the file name. If it finds one, it returns the inode number for that file name. If it doesn’t, it returns 0.
You’ll need to understand some details about the structure of directory entries within a directory file to implement this function correctly. Take a look at the comments in scandir for details.
As before, compile and run testcode until you pass all of our tests for this function. As calibration, our implementation has about 15-20 lines of code.
You’re almost done now…
Implement path_to_inode_num
The final piece we need is a way looking a particular file’s inode
based on a absolute directory path. Eg. take a string like
/foo/foo2/bar.txt and say that file’s inode is 44.
To do this we need to start at the root the filesystem, load the directory there, find the first element of the path in our structure within the directory data, load the directory there, etc.
All of the individual steps are already written, but they have to be tied together. We also put some hints in the function itself. For reference, our solution is about 20 lines of code. Use unit tests to verify as usual!
A Working Tool
Now that you’ve gotten the functions in ex2access implemented, it’s now simple to build a tool that allows access to arbitrary files on an ext2 filesystem.
Take a look at the filereader application the makefile already built for you. You should be able to invoke it like this, using any file path in the ext2 filesystem as an input:
$ ./filereader 451_filesystem.ext2 /small-file.txt
file at inode 15
outputing file named small-file.txt...
The utility creates a file in your local directory that contains the contents of the file extracted from the ext2 filesystem.
Thats it! If we wanted to we could expand these functions to allow writing, support edge cases of the ext2 spec that we ignored etc. But hopefully this by itself was enough to show you that implementing a real filesystem is a tricky but eminently doable affair…
Valgrind
Several of the functions allocate memory so we should be sure to get it run. Run valgrind on your solution to ensure memory correctness.
Turning in
Submit your ext2access.c on gradescope.
Rubic
| Points | Notes | |
|---|---|---|
| passes test cases | 93 | |
| filereader works | 3 | |
| valgrind passes | 4 |
Acknowledgement
This assignment was originally written by Steve Gribble for the University of Washington. It has been modified in various particulars for the Rose Hulman context by Mike Hewner.